Today we will talk about the short row technique. Don't worry, you won't have to cut your needles to shorten them :-) and you won't even have to buy new needles. The ones you have are perfectly fine, both long ones (if you prefer the traditional method) and circular ones (if you prefer the continental method). If you want to see the difference between the two methods, watch the second lesson of our free course.
Let's get back to short rows. This is a technique, a way of knitting, that involves working only a part of the stitches you have on the left needle: this is why it's called a short row. Once the stitches are worked, you have to turn your work and knit the return row. It's harder to explain than to do. I'm sure you'll understand immediately by watching the video.
As you may have noticed, the short row technique is used to differentiate the length of the edges: one is longer than the other. Thanks to this setup, we can create: capes, shawls, sweaters with a round yoke, or hats, with designs (for example, cables) positioned along the edge.
The number of stitches to be worked in short rows is not random. It is calculated based on the difference between the long and short edges and, of course, based on the yarn you want to use to create a garment. The correct setup is quite a difficult and challenging task, which is why I advise you against improvising. If you find a pattern you like in a magazine, you should first make a swatch and compare it with the swatch information provided in the pattern description. Only then can you start making it with the certainty that you won't have to undo it.
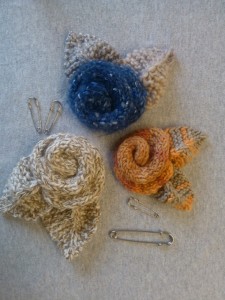
If you want to experiment with this technique without committing to a too long project, just to satisfy your curiosity, you could make the flower you see in the picture next to it.
Cast on 9 stitches (the casting on method doesn't matter) and always work in stockinette stitch, keeping selvage edges.
Proceed as follows:
1st row – knit all stitches
2nd row – purl all stitches
3rd row – knit only 6 stitches, then turn your work
4th row – slip the first stitch purlwise and purl 5 more, then turn your work again
Continue repeating these 4 rows until one of the side edges is 7 – 8 times longer than the width of the strip.
The video will help you in making the flower.
In the next video (third lesson) I will show you how to sew the strip to create the flower.
I hope the short row technique is clearer now :-).
In the next three videos, I suggest making leaves to go with the flower, even if this is not part of the technique I'm talking about. Anyway, a little extra suggestion seemed nice. In the video, you will hear about garter stitch edges. If you don't know how to make them, check out one of our previous posts.
If you love jacquard, this article is for you. Let's start with the basics: the jacquard technique (named after its inventor M. Jacquard, 1752–1834) consists of alternating threads of different...
If you love jacquard, this article is for you. Let's start with the basics: the jacquard technique (named after its inventor M. Jacquard, 1752–1834) consists of alternating threads of different...
The English rib stitch is one of the softest, most voluminous, and elegant knitting stitches. In English, it is often called English rib or associated with brioche stitch. 👉 It...
The English rib stitch is one of the softest, most voluminous, and elegant knitting stitches. In English, it is often called English rib or associated with brioche stitch. 👉 It...
When it comes to quality wools, lambswool holds a special place. It's not an exotic fiber like cashmere or alpaca, but it represents one of the purest and most natural...
When it comes to quality wools, lambswool holds a special place. It's not an exotic fiber like cashmere or alpaca, but it represents one of the purest and most natural...


 If you want to experiment with this technique without committing to a too long project, just to satisfy your curiosity, you could make the flower you see in the picture next to it.
Cast on 9 stitches (the casting on method doesn't matter) and always work in stockinette stitch, keeping selvage edges.
Proceed as follows:
1st row – knit all stitches
2nd row – purl all stitches
3rd row – knit only 6 stitches, then turn your work
4th row – slip the first stitch purlwise and purl 5 more, then turn your work again
Continue repeating these 4 rows until one of the side edges is 7 – 8 times longer than the width of the strip.
The video will help you in making the flower.
In the next video (third lesson) I will show you how to sew the strip to create the flower.
I hope the short row technique is clearer now :-).
In the next three videos, I suggest making leaves to go with the flower, even if this is not part of the technique I'm talking about. Anyway, a little extra suggestion seemed nice. In the video, you will hear about garter stitch edges. If you don't know how to make them, check out one of our previous posts.
If you want to experiment with this technique without committing to a too long project, just to satisfy your curiosity, you could make the flower you see in the picture next to it.
Cast on 9 stitches (the casting on method doesn't matter) and always work in stockinette stitch, keeping selvage edges.
Proceed as follows:
1st row – knit all stitches
2nd row – purl all stitches
3rd row – knit only 6 stitches, then turn your work
4th row – slip the first stitch purlwise and purl 5 more, then turn your work again
Continue repeating these 4 rows until one of the side edges is 7 – 8 times longer than the width of the strip.
The video will help you in making the flower.
In the next video (third lesson) I will show you how to sew the strip to create the flower.
I hope the short row technique is clearer now :-).
In the next three videos, I suggest making leaves to go with the flower, even if this is not part of the technique I'm talking about. Anyway, a little extra suggestion seemed nice. In the video, you will hear about garter stitch edges. If you don't know how to make them, check out one of our previous posts.